As promised here is my tulip sleeve tutorial.
Tulip sleeves are an overlapped sleeve that can be fitted or puffed. It allows for a greater range of motion than the normal cap sleeves and adds some variety. You can trim the edge of the sleeve with pleats, ruffles, braided or beaded trim or lace. I have used all of the above at different times. This is one of my favorite sleeve options when it comes to designing a dress.
It was popular in a lot of vintage patterns.
It goes especially well with the princess neckline.
I just love the added lines it gives to a dress. And I like to use it when I am making a dress for someone and don't have their upper arm measurement. This way it looks like a fitted sleeve but I don't have to worry about it being restrictive.
The overlap can be placed in the back or in the front. It is up to you on what you want to overall look to be.
I even found this picture of a four part tulip sleeve. I want to try this some time on a light filmy material for a formal.
It was also the sleeve pattern on the teal dress that Amy Adam's wore in The Muppets.
So here we go with the tutorial for making a fitted tulip sleeve.
You can either start with a basic sleeve pattern block and cut it down to short or you can use a cap sleeve pattern that you like. I will show you how to do either.
If you are using a long sleeve patterns block you will first determine the length of the sleeve at the under arm and mark that. You will then draw a line connecting the marks. The illustration shows 1" down from underarm.
To establish curve for lower edge - measure up from new line at center and draw curve as shown. Illustration shows 1"
Cut apart on curved line.
If you are not cutting down a long sleeve pattern and just using a cap sleeve pattern that you already have then you will start your alterations here.
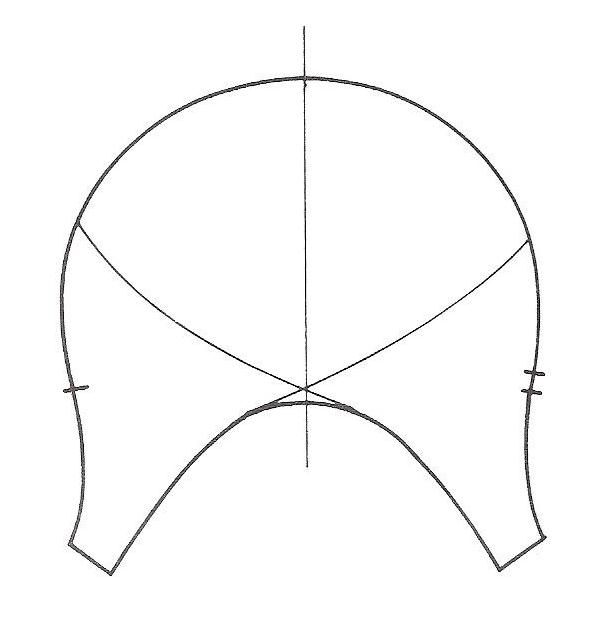
Divide sleeve into four equal parts.
Slash from bottom of sleeve to cap.
Lap each slash at bottom 1/2" for fit.
Smooth curve at lower edge.
(Note. The slashing and overlapping is not completely necessary. It just depends on how much you want it to fit or flare out. Play with it and have fun.)
Next you will be drawing the curved lines that form the sleeve into the tulip. You can decide how much of a curve you want. Just make sure you make both curves even.
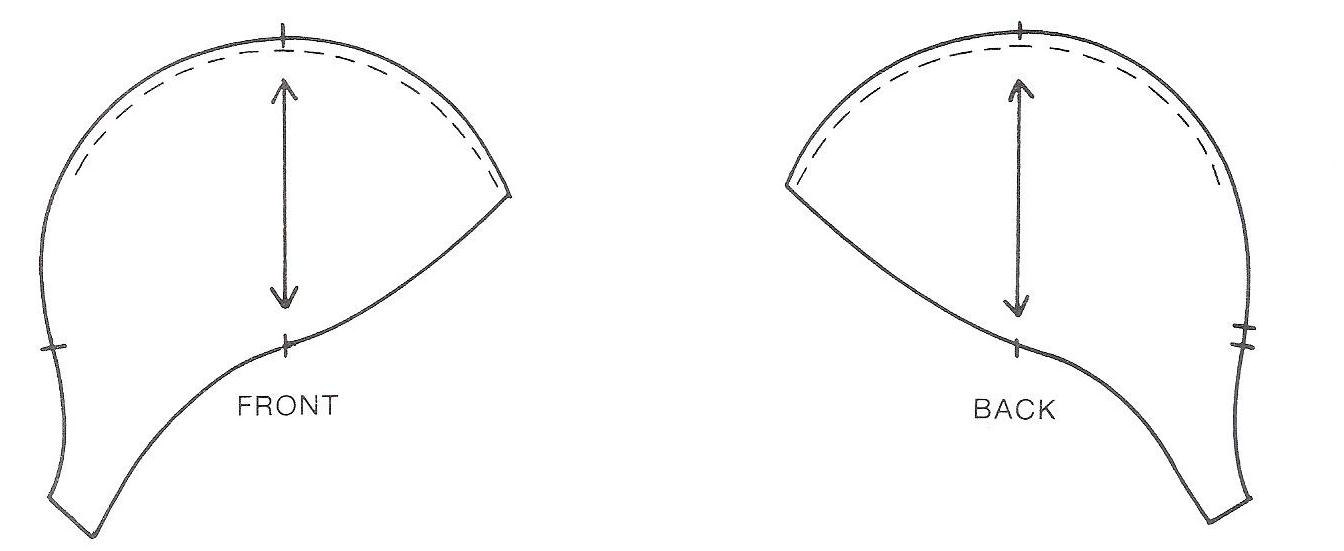
Trace around the entire front sleeve using the curved design line, making sure to mark the center top and the notches.
Trace around the entire back sleeve using curved design lines, making sure to mark the center top and the notches.
Label grain lines and make sure the seam allowances are what you want them to be to complete the patterns.
Now on to making a puffed tulip sleeve.
Again you can use a basic sleeve block or a cap sleeve pattern.
It is all the same steps so far as making a fitted tulip sleeve.
You are going to divide it into the four parts.
Do the optional overlapping.
Now you are going to divide the sleeve into 8 vertical parts.
Slassh the sleeve from top of cap to bottom of sleeve.
Spread for desired fullness.
Raise sleeve cap to allow sleeve to to "puff", adjust seam line as shown.
(Note: you can also just use a puffed sleeve pattern and draw the curve lines directly on to it. Just keep in mind if it is a puffed sleeve pattern were the fullness is. You will want all the fullness in the top of the sleeve and minimal fullness at the bottom.)
Draw curved design lines as shown. You can play around with it on exactly how you want the curve to look. Just make sure both lines are matching.
Trace both the entire sleeve front and back using the curved design lines, making sure to mark the top and notches.
And there you go, you have two different types of tulip sleeves.
As far as sewing them goes....
The first step in assembling the sleeves is to sew the underarm seams together.
You will then want to finish the edge of the sleeve.
You can either finish it with a rolled hem.
Or you can also finish it with a ruffle or a piping or whatever fits your design. Or you can line the sleeve as well.
Then you will match the sleeve centers and baste the sleeve together so that is looks like a normal sleeve. Make sure when putting them together you have the sleeves so that they will be the opposite of each other.
That is all for now. Hope that makes sense. I will try to run around and take pictures of some of the different tulip sleeves I have done in my time. I will also try to get a few more pictures explaining how to put the sleeves together.
Oh, and I realized that this is my first post of the year. Happy New Year!!!
Toodles.